What is RapidCompact CLI?
Welcome to the documentation of RapidCompact CLI, a powerful 3D data optimization tool using a Command Line Interface (CLI).
While a CLI tool is pretty powerful, it may seem more complicated to use for users that are not experienced with a command line. If you would like to use something more simple and graphical instead, we recommend to take a look at our RapidCompact.Cloud portal. However, even as an unexperienced user, RapidCompact CLI is still relatively easy to learn, after a short look on how the basic commands are working. Throughout the following tutorials, we will assume that you have RapidCompact installed, and that you have set up a valid licensing key as well.
Basic Usage by Example
To launch RapidCompact CLI, you'll need to open a command line window first. If you're running Windows, you can use the Windows PowerShell for this purpose. The name of the RapidCompact CLI executable is rpdx. With a correct installation on Windows, you should see something like the following after you typed rpdx inside your command line Window and pressed the Return key:
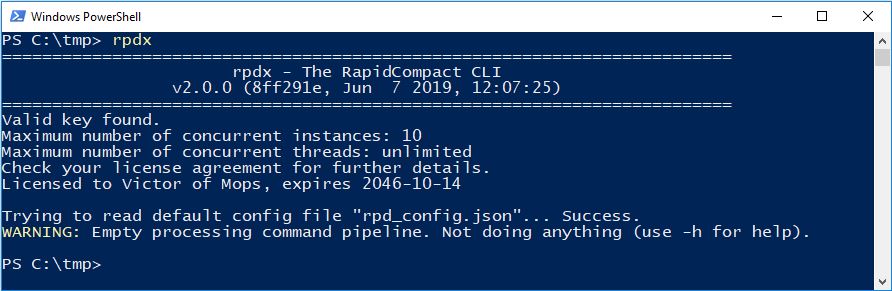
As you can see, when launched, RapidCompact CLI will report different basic pieces of information, such as the version of the software and licensing details. There is also a warning about the command pipeline being empty - this means that RapidCompact CLI tells us it doesn't know what to do, since we didn't specify any actual command to be executed.
To specify a command, use two dashes followed by the command's name, and possibly followed by the command's parameters (or arguments), if any. Here's a basic example, using this file:
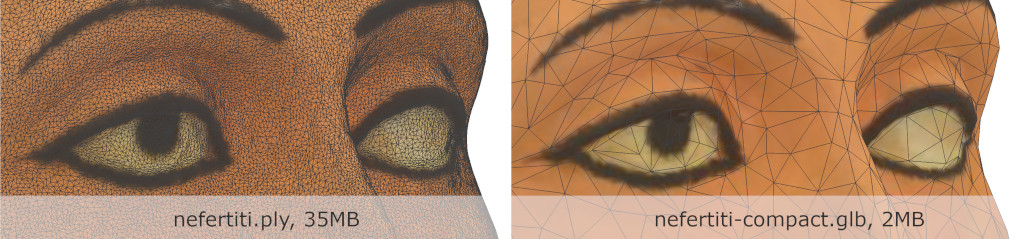
rpdx --import nefertiti.ply --compact --export nefertiti-compact.glb
The result is a quite compact GLB file, which is only around 2MB in size, compared to around 35MB in the original version!
Shortcut #1: If you use the Windows Explorer to navigate to a certain directory where you store your 3D models, you can hold the SHIFT key and then right-click into that directory. The context menu will then show an entry "Open PowerShell windows here".
Shortcut #2: Once PowerShell is open, you can make life easier by typing only the first few letters of each filename (for example, the "n" or "ne" of "nefertiti.ply") and then pressing the TAB key once or multiple times. PowerShell will then suggest existing filenames through auto-completion, so you don't have to type in the full names yourself.
Background and Advanced Usage
So, how exactly did we achieve this result? The commands are executed in order, from left to right. As you may guess from the names of the commands, the first command, import, loads the example file, which is in this case a PLY file called nefertiti.ply. Of course, if your file is called differently or uses a different format, just insert the appropriate filename here instead. After loading, we use the compact command to reduce the model to a suggested default resolution for the Web. Here, we could specify a target rate (number of faces or vertices, or desired size in MB), but for now we just use the default setting. The third command, export, finally exports the compact result as a GLB file. Similar to how it is done for import, you can specify any filename and supported export format you'd like.
Many commands have an additional shorthand version, which is only using a single dash and a single letter (most times the first one) of the command's name. Using shorthand commands, above example looks like the following:
rpdx -i nefertiti.ply -c -e nefertiti-compact.glb
Of course RapidCompact CLI can do more than just --compact. You can see a list of all supported commands by typing
rpdx --help
or simply:
rpdx -h
Also, the following command will create a config file, which will be placed inside the current directory. Inside this file, you'll be able to tweak a lot of settings that specify how exactly RapidCompact optimizes your 3D model:
rpdx --write_config
Supported 3D File Formats
As you could see above, you can use the command -i to import 3D Files and the -e command to export. But what file formats are supported by RapidCompact? A detailed Guide of supported 3D and Texture formats can be found here. Additonally here is a quick overview of the currently supported 3D formats:
- OBJ
- glTF (.gltf and .glb)
- USDZ (export only)
- PLY
- FBX (import only)
- STL
- JT (import only
- STEP (import only
- IGES (import only
- CTM
Congratulations - if you made it until here, you already know all the basics that are necessary for an efficient use fo RapidCompact CLI! To learn more about the configuration possibilities and about the various commands, just take a look at the following tutorials.
next page >