In this tutorial, we are going to explore how RapidCompact utilizes flattening modes and settings in order to steer the optimization of the scene hierarchy of a given 3D model.
To cover all sorts of possible further usage of optimized models, RapidCompact offers four unique flattening modes. Instead of merging all geometry and material information into single nodes (and hence into single drawcalls), you can specify a mode in order to preserve more of the original materials, meshes and/or hierarchy. In order to also more directly flatten the existing scene hierarchy, please refer to the Flattening by Scene Depth Section. The available flattening modes are as follows:
| Name | Type | Default | Valid Range | Quick Description |
|---|---|---|---|---|
| flattening:mode | String | auto | {'auto', 'byOpacity', 'byMaterial', 'full', 'none'} | mode to be used for flattening |
Not using any flattening has specific benefits and potential downsides as well, also depending on what mode is chosen for the specific input mesh:
Benefits:
Potential Downsides:
Performance:
We just saw how the usage of different flattening modes can have benefits and downsides. To get a better picture what that means in terms of performance and materials of a 3D model, we will produce four different versions of the example file:
rpdx -i FlightHelmet.gltf -s flattening:mode byOpacity -c f:25% -e FlightHelmet-compact-byOpacity.glb
rpdx -i FlightHelmet.gltf -s flattening:mode byMaterial -c f:25% -e FlightHelmet-compact-byMaterial.glb
rpdx -i FlightHelmet.gltf -s flattening:mode full -c f:25% -e FlightHelmet-compact-full.glb
rpdx -i FlightHelmet.gltf -s flattening:mode none -c f:25% -e FlightHelmet-compact-none.glb
When comparing the results, we can see that each .glb file has a different number of drawcalls and nodes. Also, the result in the bottom left corner lost the transparency because of using the "full" flattening mode (we did already cover that case in the the first section).
The other results are mostly behaving according to the syntax behind the flattening. The version reduced with "byOpacity" produces two drawcalls from two different meshes so that the transparent glasses and the opaque parts can be rendered correctly. In this case the flattening "none" version has almost the same result due to the structure of the input mesh. This might differ depending on the organization of the input mesh and hierarchy.
Overall, we can say that using RapidCompact's standard setting (flattening mode "auto") produces results supporting and preserving transparency without compromising the performance too much. Of course, an input file with a lot of unique transparent parts will have more drawcalls than with the "full" flattening mode, but the consequences regarding performance should be still minor and usually the benefits of preserving transparency should outwheigh the additional drawcalls and nodes.
Hierarchy Preservation:
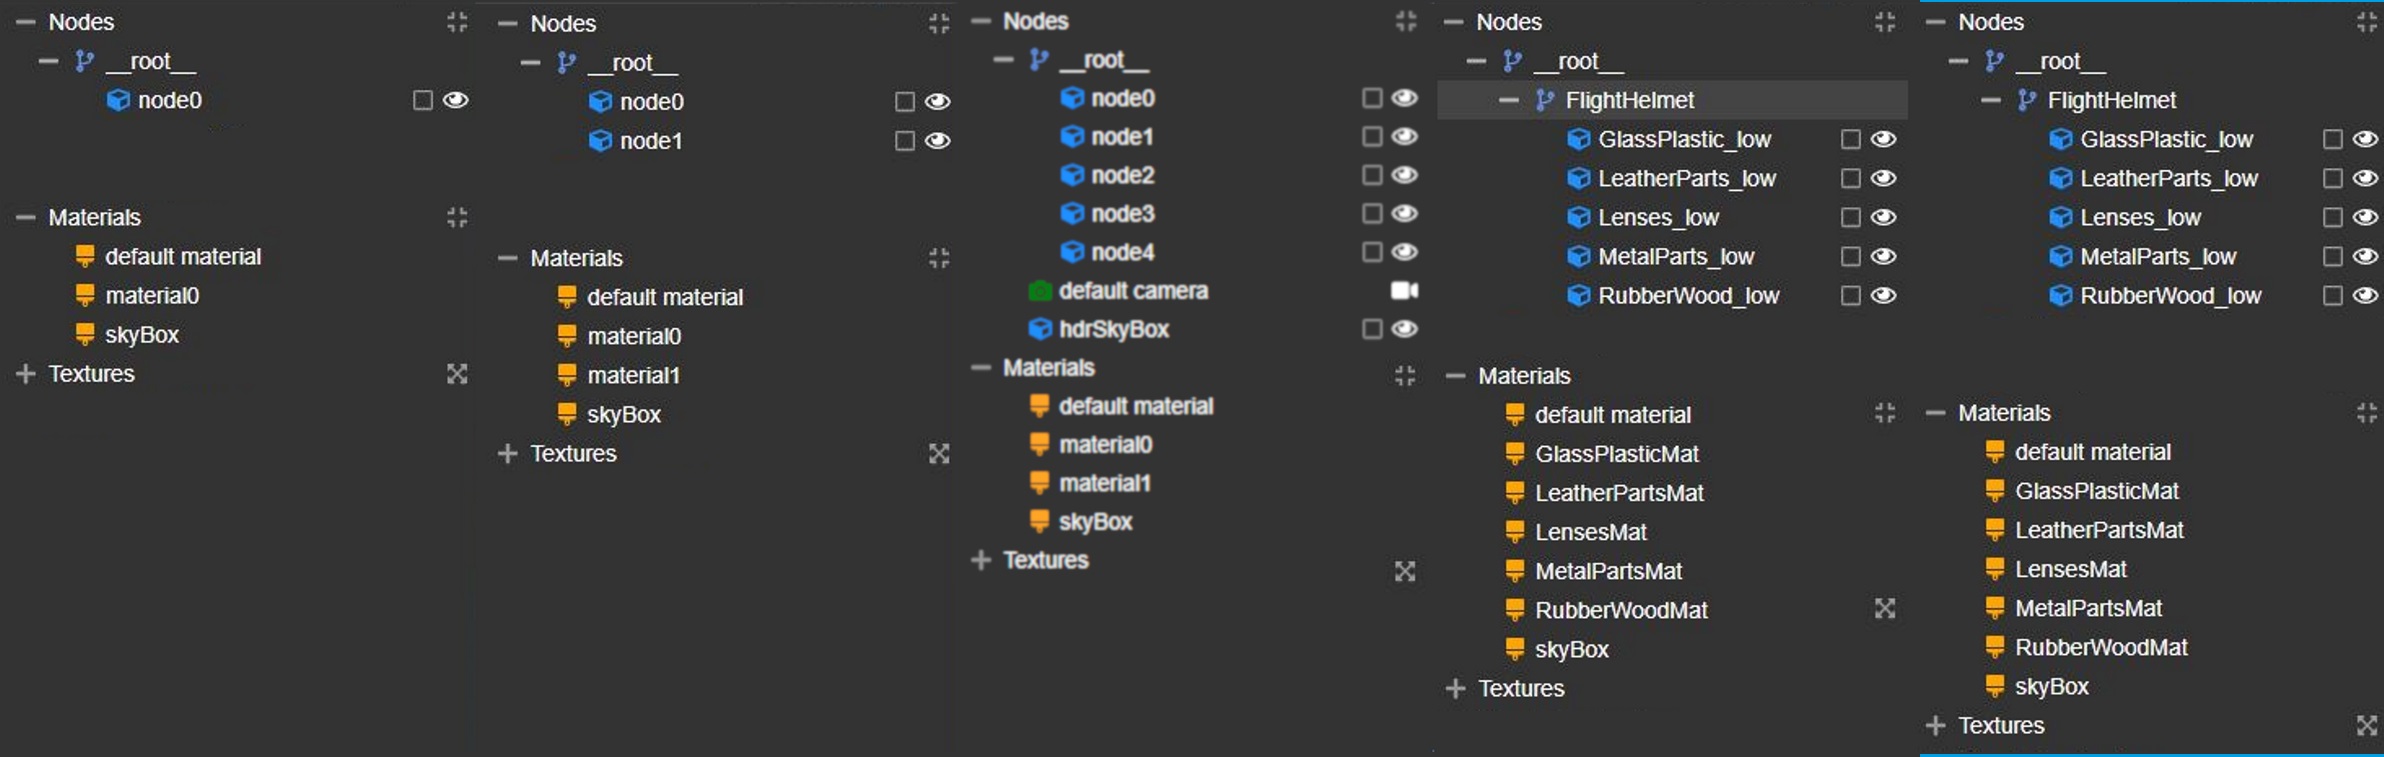
Let us take the models produced in the previous section and this time have a look at the glTF hierarchy in the different output files in comparison to the original hierarchy:
As you can see, the hierarchies of the generated results give a good overview on how RapidCompact can use a grade of flattening specifically tailored to the needs of each final application. In comparison, the flattening mode "none" will preserve the nodes and naming conventions of the original, whereas the "full" and "byOpactiy" modes will flatten either everything or all opaque nodes, respectively. Like "byOpacity", the "byMaterial" mode will usually produce a different number of nodes than given in the input model. The only difference between these two modes is that "byOpacity" will merge together all nodes that have the same opacity category (transparent or opaque), while "byMaterial" merges together all nodes that have the same material.
Draw Calls vs. Materials or Atlases:
Within this tutorial, we have learned how to use RapidCompact's flattening feature to produce assets with a low number of draw calls, fitting the needs of a certain target application - for applications that require separate nodes (for example, to show, hide or transform them individually during runtime), no flattening is necessary, while others can use flattening by opacity or by material to achieve a lower number of draws, hence boosting the rendering performance. Within the next tutorial, we are going to have a look at atlasing modes, which will allow us to configure how RapidCompact creates texture atlases when creating new, optimized materials.
In addition to the flattening modes, RapidCompact also introduced a setting which can give some more control over the existing scene graph:
| Name | Type | Default | Valid Range | Quick Description |
|---|---|---|---|---|
| flattening:preservedSceneDepth | Int | 0 | {0 .. inf} | number of layers in the scene structure that should not be flattened |
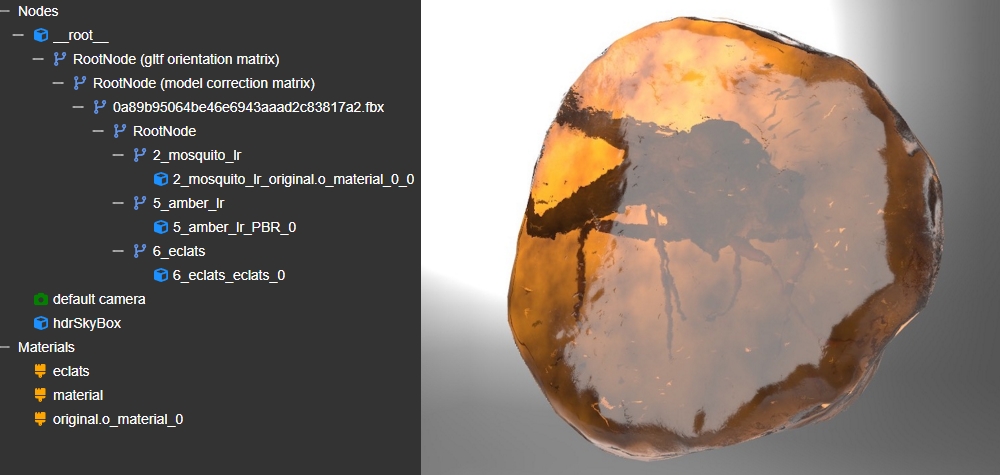
This setting will specify the level of node hierarchy which should be preserved during optimization. A level of 0 turns of the setting and thus does not preserve any hierarchy (RapidCompact Default). To better understand this feature, let us look at an example model:
Let's get started by importing the asset and performing the following flattening operations:
rpdx -i MosquitoInAmber.glb -s flattening:mode auto -s flattening:preservedSceneDepth 0 -c -e auto-sceneDepth0.glb
rpdx -i MosquitoInAmber.glb -s flattening:mode auto -s flattening:preservedSceneDepth 1 -c -e auto-sceneDepth1.glb
rpdx -i MosquitoInAmber.glb -s flattening:mode auto -s flattening:preservedSceneDepth 5 -c -e auto-sceneDepth5.glb
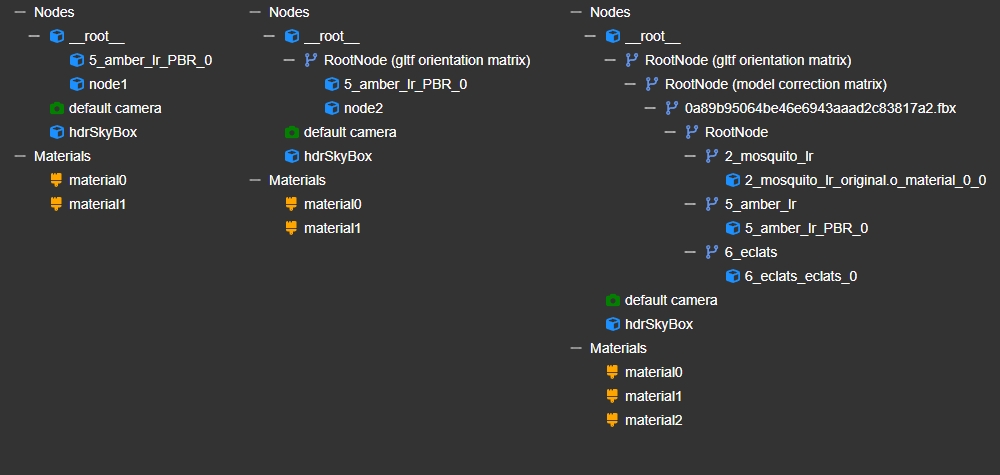
Results:
As you can see, the flattening operations were successful and especially scenDepth 1 and 5 had a very distinguishable effect on the output scene structure. Level 5 brings the structure actually almost in line with the original scene hierarchy (see above).
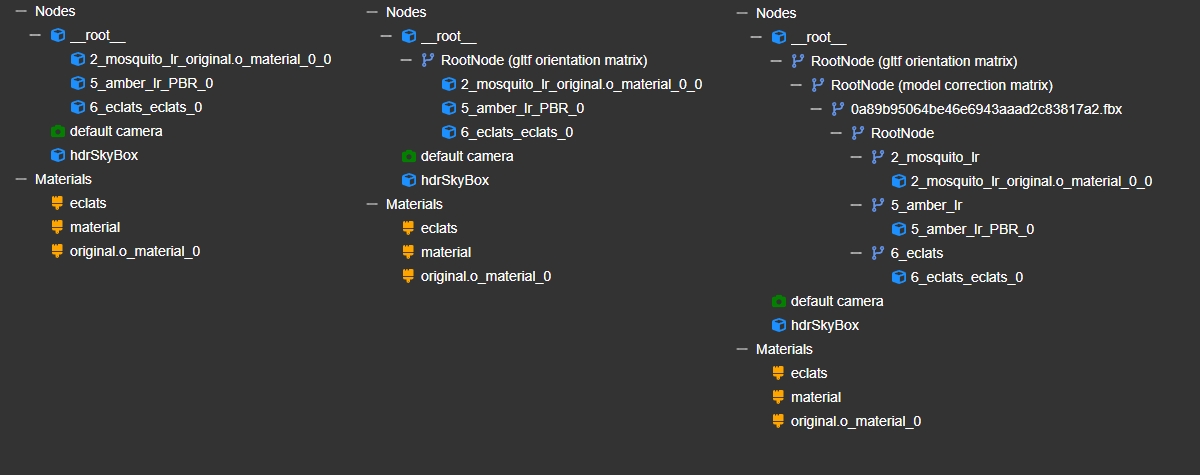
However, note how the material names are not preserved as these might be merged depending on opacity. Let`s try with the flattening mode byMaterial again, in order to preserve all Materials and their names:
rpdx -i MosquitoInAmber.glb -s flattening:mode byMaterial -s flattening:preservedSceneDepth 0 -c -e byMaterial-sceneDepth0.glb
rpdx -i MosquitoInAmber.glb -s flattening:mode byMaterial -s flattening:preservedSceneDepth 1 -c -e byMaterial-sceneDepth1.glb
rpdx -i MosquitoInAmber.glb -s flattening:mode byMaterial -s flattening:preservedSceneDepth 5 -c -e byMaterial-sceneDepth5.glb
Results:
Notice how the material names are preserved now due to the given flattening mode byMaterial.