Within this tutorial, we are going to use RapidCompact CLI to create a compact, textured representation of a mesh. The resulting model will be just a fraction of the original size, but visually it will be almost identical. We will first do this using default settings, and then tweak some parameters to generate more polished and impressive results. Finally, we will check how to present the results in different contexts.
To get started with this tutorial, we will need to have a 3D model to play with. Please go ahead now and download the elephant model, which we will use throughout the tutorial, here. Initially, when loaded into some 3D tool like MeshLab, the data should look like this:
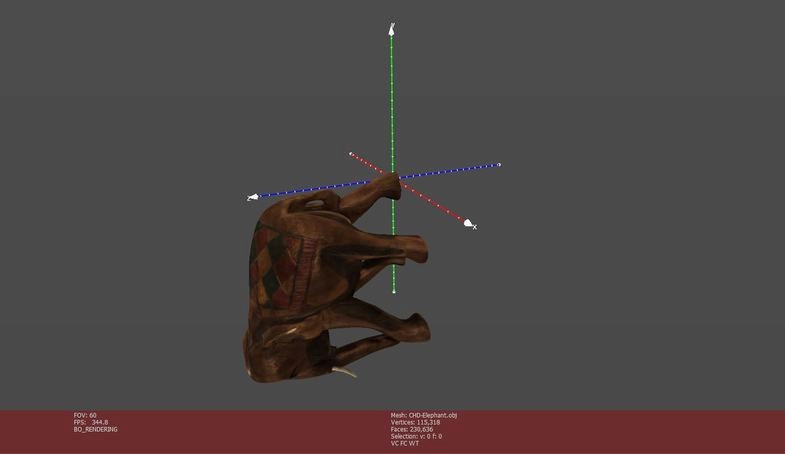
As you can see, the model has a wrong orientation, and this will be the case in many 3D viewers. The reason for this is that the software which exported the scanned 3D data used a different orientation where the z-axis is pointing upwards, whereas many viewers are using a coordinate system where the default up-axis is the y-axis. We'll see how to fix this in a minute. But first, let's apply the default settings and perform some optimization to see what it does!
RapidCompact CLI has a lot of commands and settings that can be used to tweak the decimation, UV unwrapping and texture baking processes. However, there's also a very simple master command, entitled compact, and we will use it to optimize the elephant model in order to obtain a more compact version.
Enter the directory where you stored the unzipped 3D model. It should contain 14 different texture images (5.81 MB) and an OBJ file with material (.mtl) information for the actual mesh data (27.5 MB). In total, this input data set has a size of more than 30 MB, and it consists of over 230,000 polygons and 14 texture images of 1024x1024 pixels each, adding up to 14 Megapixels of texture data in total.
To apply the default optimization, which will reduce the mesh to around 20,000 polygons and 4 Megapixels of texture data for the colors, apply now the following command:
rpdx -i CHD-Elephant.obj -c -e compact/compact.obj
This will create a new directory called compact, and the resulting OBJ file and texture images will be stored there. The resulting data set will be much more compact, but it will still look very similar to the original. Here's how it looks like with a partial wireframe overlay, illustrating the underlying mesh before ...
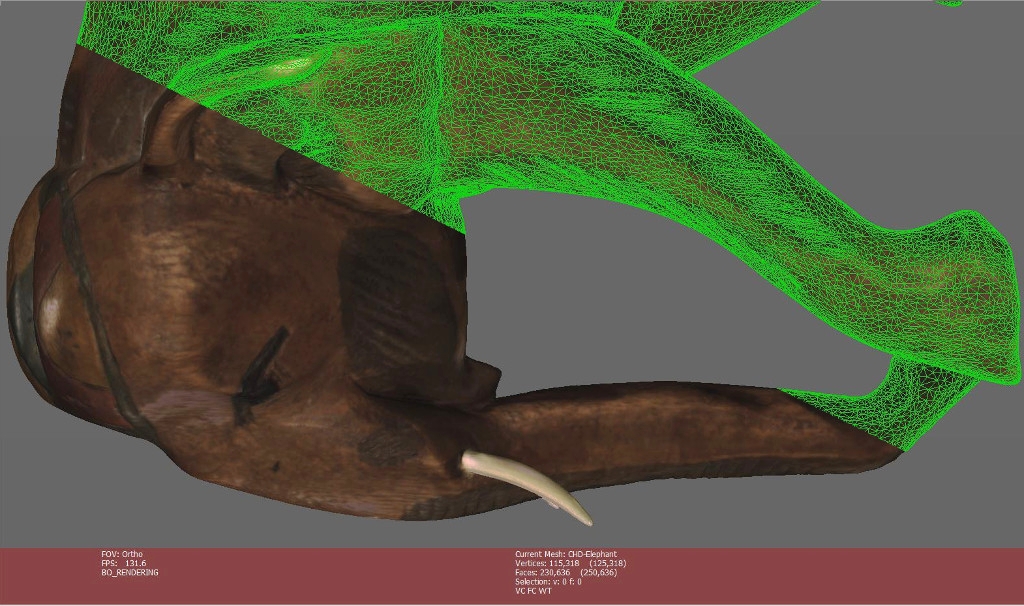
... and after the optimization:
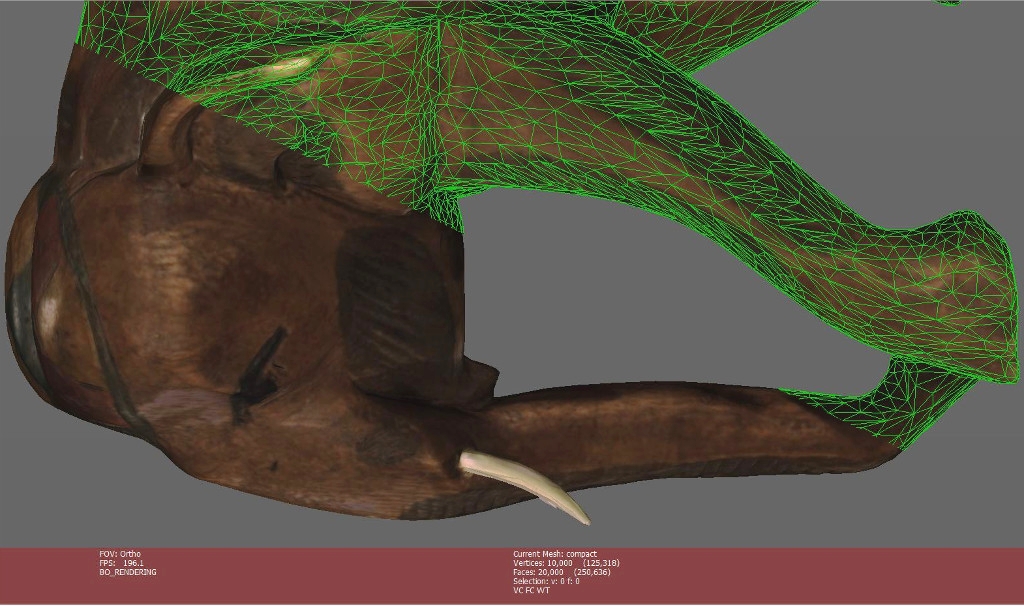
The model's data, consisting of color texture and mesh, now only makes up 2.14 MB, as opposed to more than 30 MB in the input, and it still looks almost identical - not bad! However, in order to obtain the best possible results for this use case, there are a few things that can be improved by tweaking the settings a bit, and this is exactly what we will do now.
Since many modeling tools and other software packages use a z-axis pointing upwards, RapidCompact CLI has a special setting to rotate data accordingly during import. This setting is entitled import:rotateZUp, and it is set to false by default. We could now simply change that setting using the command line. However, as we'll change other settings later as well, and since we'll possibly want to apply the same process to other 3D models from the same source, it seems worth to create a config file and adapt the settings there. To create a config file with default settings, now use the following command within the directory where the input data is stored:
rpdx --write_config
This will create a JSON file with default settings. We can now simply modify the ones we want to change and ignore other settings. If a setting is not specified within the config file, RapidCompact will use default settings for it. Therefore, we can now go ahead and safely remove all the settings except for the ones to be used within this tutorial. Change the content of the config file to the following (note the true) and save it:
    {
      "import:rotateZUp": true
    }
For convenience, RapidCompact CLI searches the current directory for a config file named rpd_config.json (if you want to import one with a different name, or from elsewhere, use the --read_config command). This means we can obtain the modified result, with correct orientation, by simply running the original command again, knowing that RapidCompact CLI will pick up the config file and read and apply the rotation setting:
rpdx -i CHD-Elephant.obj -c -e compact/compact.obj
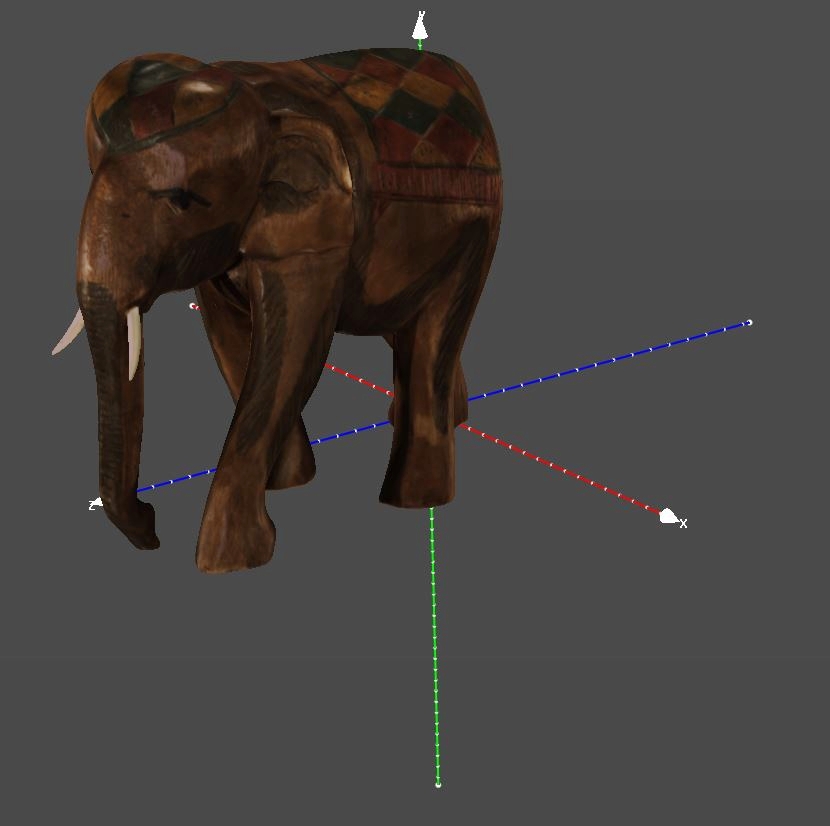
The optimized model should now be properly rotated:
You may have noticed that the output directory for the compact version of the model does not only contain a color texture, but also a normal map. This normal map can be configured to be in tangent space (default) or to be in object space, or we can completely disable its generation. In this case, the elephant model's texture already contains lighting (see the highlights on the head and ears, for example). Therefore, depending on the rendering method, we may not want to use a normal map at all. To turn the generation of the normal map off, simply add the "baking:generateNormal" option to the config file and set it to false :
    {
      "baking:generateNormal" : false,
      "import:rotateZUp"      : true
    }
If you like, add this setting, delete the contents of the output folder and re-run the optimization to convince yourself that no normal map will be generated any more. In the opposite case, when we want a 3D model to be re-lighted during real-time rendering, it will of course make sense to bake a normal map. In addition, one may also want to have an ambient occlusion map or a displacement map, and all of these can be baked using RapidCompact CLI, using the corresponding settings. For now, let's continue with the things that we can further optimize for this model!
Besides the mesh simplification (also known as "mesh decimation"), one crucial part of the 3D optimization process is the generation of texture maps, using a UV atlas. This UV atlas maps the 2D texture images to the 3D surface, and during this process stretch and seams may possibly occur. While RapidCompact CLI will always try to minimize stretch, there are some tradeoffs to be made. For example, different UV unwrapping algorithms may be used, where some of them will take more time and deliver better quality, while others may be much faster, at the expense of a decrease in mapping quality. Also, the way the 3D mesh is segmented into different charts, which will then be unwrapped and placed inside the texture atlas, may have a huge impact on the final result. In order to tweak the results in order to obtain even better results for a specific use case, it may therefore be useful to adapt the default parameters a bit. But first let's see how we can analyze the quality of a given texture atlas!
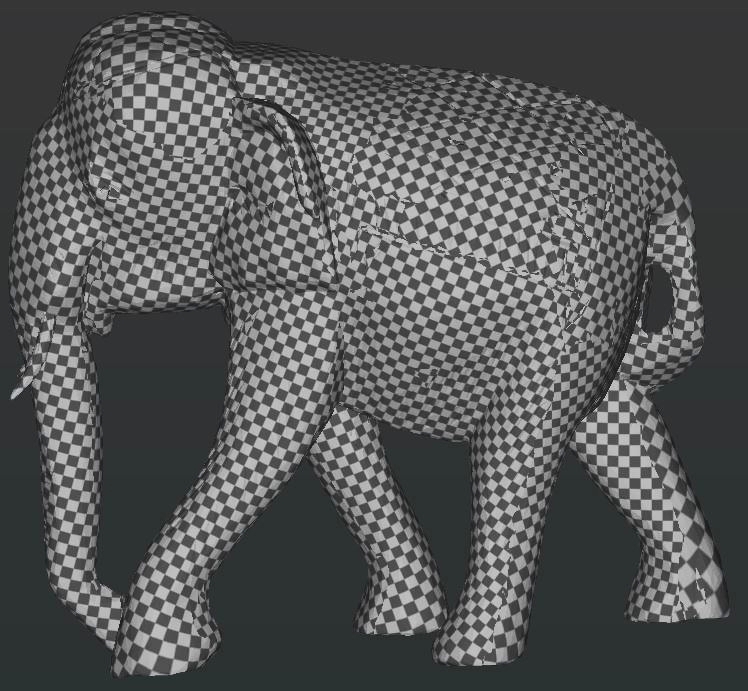
The most common way to assess the quality of a texture mapping is to visualize it using a 2D checkerboard pattern, which is mapped onto the 3D surface. This allows us to see where angles are not preserved (checkerboard squares will not appear as squares any more), or where areas are not preserved (checkerboard size will vary across the 3D surface). We will also be able to see where UV seams are, and how many we got. Most 3D artists have a favorite tool to perform this analysis, and you should now feel free to use whatever software you want to perform it. However, if you like, you can also use RapidCompact to generate a checkerboard texture for testing purposes, and then visualize the result using RapidCompact itself (using the image or turntable rendering commands), or any other software that can show textured models (such as MeshLab, for example). Here's the command that will generate a clone of the compact version, but using a checkerboard texture:
rpdx -s import:rotateZUp false -i compact/compact.obj --set_checker_texture -e uv-test/uv-test.obj
Note that our config still contains the parameter that forces the z-axis to point upwards, which we don't want to be applied for the already properly rotated compact version, so we can override that parameter on the command line temporarily, setting it to the default value false again. The resulting textured model should look like this:

This is actually quite nice! There is not much visible stretch, all fields of the checkerboard look evenly shaped (undistorted) and equally sized. Let's see what happens if we set the unwrapping:method setting to "conformal" inside our config file:
    {
      "baking:generateNormal" : false,
      "import:rotateZUp"      : true,
      "unwrapping:method"     : "conformal"
    }
We can then re-run the optimization, and this time directly export a checkerboard version of the 3D model for analyzing the stretch again:
rpdx -i CHD-Elephant.obj -c -e compact/compact.obj --set_checker_texture -e uv-test/uv-test.obj
The result should look like this:
The conformal unwrapper is a bit faster, but it can't achieve such as a nice result as the isometric one: As it only optimizes for the preservation of angles, but not for the preservation of areas, there's a visible area stretch at the bottom right of the image (on the elephant's right back leg). The isometric unwrapper, in contrast, balances preservation of area and shape, and in this case it has distributed the distortion in such a way that it isn't really visible.
Apart from reducing the stretch through the use of a more sophisticated unwrapping method, one could further optimize the 3D chart layout (seams) by adjusting the segmentation parameters, as listed in the settings section of the cheat-sheet. With a chart layout that contains more cuts, you'll be able to obtain a distortion-free mapping even with the conformal unwrapper.
It could be that the default mesh resolution for the compact version of 10K vertices (here leading to 20K faces) will not be exactly what we want for our application. For example, we could possibly have enough bandwidth and rendering power to support more faces, or we may want even less. To generate a very compact version with 2K vertices instead, we can simply add a corresponding parameter to the config file:
    {
      "baking:generateNormal"    : false,
      "import:rotateZUp"         : true,
      "unwrapping:method"        : "isometric",
      "decimation:defaultTarget" : "v:2000"
    }
Let's then generate this version and name it differently, so we can compare the results for the two different mesh resolutions:
rpdx -i CHD-Elephant.obj -c -e compact-30K/compact-30K.obj
Instead of the 2.15 MB of the 10K version, the new directory for the 2K version is only 795 KB in size. Here's a side-by-side comparison of the elephant's head at 10K vertices (left) and 2K vertices (right):
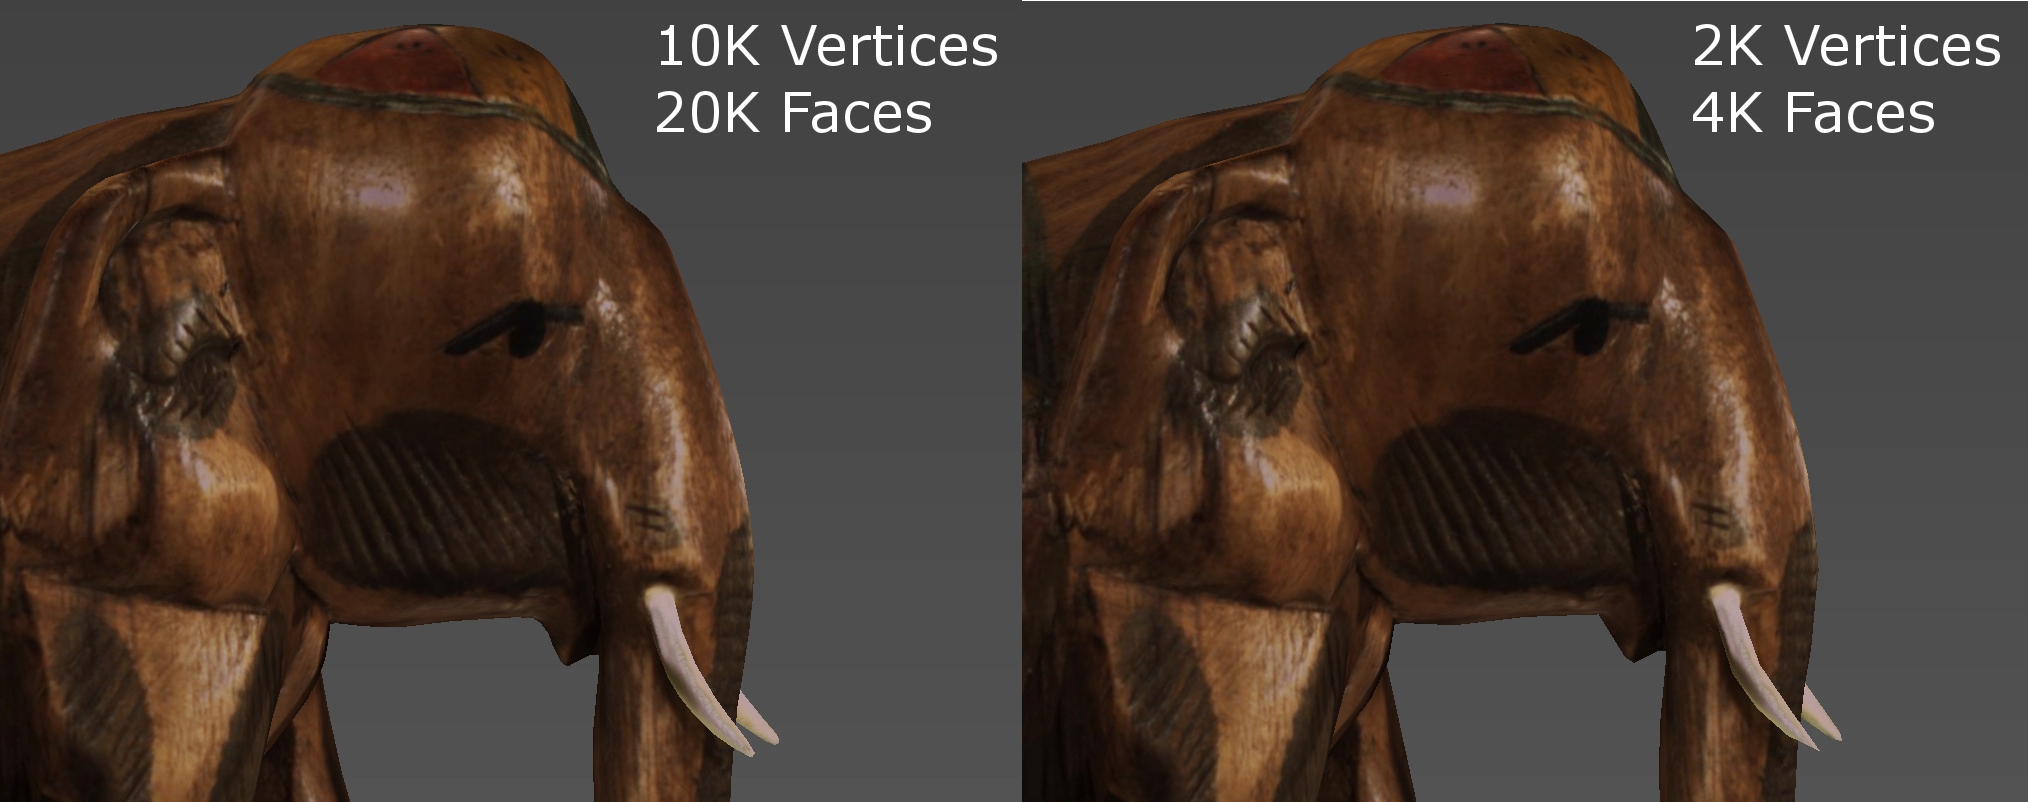
As can be seen, RapidCompact CLI does a really good job in making most of the given budget - the low-resolution version looks almost identical. However, some details are clearly getting lost, such as the slightly rounded tips of the elephant's teeth, which got sharply pointed tips in the reduced version on the right. Similar to the resolution of the mesh geometry, the desired texture resolution can be configured for each map, using the corresponding settings. Finally, the file format for texture maps, which can be configured as well, will also influence quality and compactness of the image data (for example, using JPEG provides really compact images, but the format is not loss-free, in contrast to PNG).
When delivering 3D models on the Web, or when aiming at a more compact storage, there are actually much better options than using the OBJ format for export. The first option is to simply write a binary glTF (.glb) file. This format can be processed by various kinds of 3D viewers, including not only Web-based ones but also many modern Mixed Reality tools on MS Windows, and it can even be read by modern MS Office versions. Concretely speaking, this means you can upload a .glb model generated by RapidCompact CLI to facebook (if it's not too large), use it in a custom Web viewer, in a Windows Mixed Reality app on a tablet, or show it in 3D as part of a power point presentation. The possibilities are almost endless! To write a .glb file, instead of using OBJ, simply change the file extension, as done for this command:
rpdx -i CHD-Elephant.obj -c -e compact-glb/compact.glb
You will notice that the texture images are gone, the output directory will just contain a single .glb file. That's OK, since the .glb file exported by RapidCompact CLI is self-contained and therefore already contains all the texture data, as well as the actual mesh and all parameters that are necessary to render it. In case you prefer to have the texture images and geometry buffers in separate files (for example, to allow for easy inspection or parallel downloads), you can simply use the .gltf extension instead of .glb:
rpdx -i CHD-Elephant.obj -c -e compact-gltf/compact.gltf
In addition to pure glTF export, RapidCompact CLI is also able to export directly a ready-to-use HTML viewer. You can try it yourself by using this command:
rpdx -i CHD-Elephant.obj -c -w compact-web
Note that here we use the -w command, and we don't specify a filename, but just a directory name. The resulting directory should look like this:

As you can see, there are quite some different files which were written by RapidCompact CLI and which make up the Web page containing the 3D model. This directory can directly be deployed as-is on a Web server, and by accessing it using a Web browser (on a PC or mobile device), you'll be able to see a Web-based 3D viewer! Here's how it should look like:
Note, however, that you'll need some form of Web server, but even a local application, such as the Python interpreter, can be used to start one. Without a web server, for security reasons, most browsers will not load the image and mesh data when opening the HTML (as this would mean unfiltered hard disk access of the Web application). Corresponding suggestions on quickly setting up a very simple Web server for testing are outlined inside the README file, which has been written to the output directory as well.